step by step radiator rebuild,5-17-09, tested.

1941 - 1945, MB, GPW Technical questions and discussions, regarding anything related to the WWII jeep.
Lew Ladwig
G-Major General
G-Major General
Posts: 3092
Joined: Wed Dec 25, 2002 6:58 pm
Location: Lafayette, Colorado

step by step radiator rebuild,5-17-09, tested.

Post by Lew Ladwig » Mon Apr 06, 2009 6:14 pm

I found a good GPW radiator. I thought I would do a step by step rebuild of it and show you the info as I go along. Not sure how long this will take but my last one was less than a month.
Here is the radiator:
Image
Most of the thin fins are bent over but the tubes look to be OK. It has the correct 45 cut on the sides and the center missing tube. The tanks have several dents and the bottom tank is bulged out. This is probably due to freezing. I took several pictures. I will take some good measurements of the way the frame fits.
My plan is:
Measure
remove frame
remove tanks
clean and rod
pound out tank dents etc.
straighten fins
remove tarnish
resolder
add shroud
add over flow tube
paint
zinc plate carrige bolts

Stay tuned!
Lew
Last edited by Lew Ladwig on Wed Jun 17, 2009 5:46 am, edited 9 times in total.
Lew Ladwig
CMHG, 9th ID, Commander
BSA Crew 42 Advisor, 9th ID reenactors
CFFC, IFFC president
2-'47 cj2a's
1-'45 gpw in full resto mode


User avatar
Bob Shaw
G-Brigadier General
G-Brigadier General
Posts: 2016
Joined: Tue Dec 17, 2002 5:24 pm
Location: Central Texas
Contact:

Post by Bob Shaw » Mon Apr 06, 2009 6:44 pm

Lew,

I am really looking forward to this series.Thanks for posting.
Flatfender Restorations 214-236-2535
Spc4 Robert Shaw 13F US Army/TANG 87-92
http://www.surfacezero.com/g503/showpho ... 61&cat=861" onclick="window.open(this.href);return false;
MB351461 07-15-1944 USA 20615850

User avatar
Geordie8888
G-Command Sergeant Major
Posts: 244
Joined: Sat Jul 19, 2008 7:54 am
Location: A Brit in Superior, CO, USA

Radiator

Post by Geordie8888 » Tue Apr 07, 2009 4:19 pm

Lew,

Good to know you found a GPW radiator - did you find it locally?

I'm looking forward to your rebuild post.

Cheers

Simon
_________
Aug '42 MB 164337
Apr '43 MB 223831
British Airborne 10cwt Trailer
MVPA 31961 / MVCC (CO)

Lew Ladwig
G-Major General
G-Major General
Posts: 3092
Joined: Wed Dec 25, 2002 6:58 pm
Location: Lafayette, Colorado

Post by Lew Ladwig » Tue Apr 07, 2009 7:06 pm

Yes, I found it at Eric's place in Longmont! He called me and said he did not know for sure but there was a chance. Sure enough it was hanging there by one hose. No other mountings.

So here is the latest phase of work:
Image
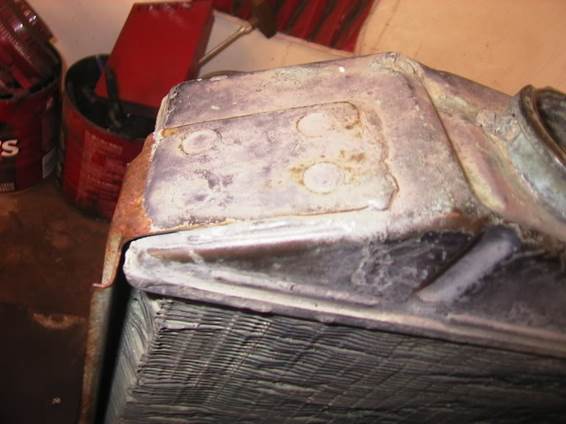
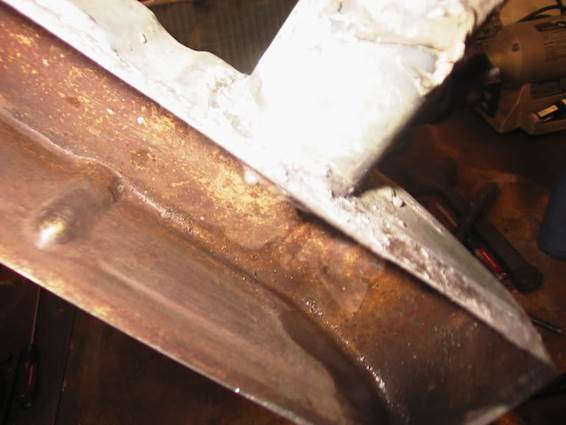
You can see where the frame is soldered to the top tank, there is also solder along the bottom and the lower corner tabs. Mine had broken the solder joint at the corners and most of the bottom.

Image
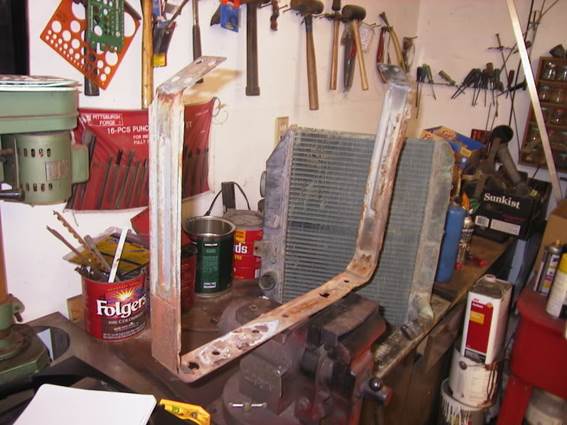
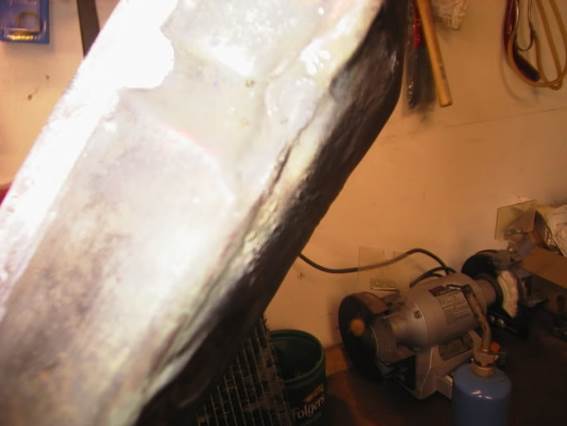
Here is the frame removed. Now I can sand blast it and bend it back straight. Many of these are rotted by the battery and could be repaired at this time.

Image
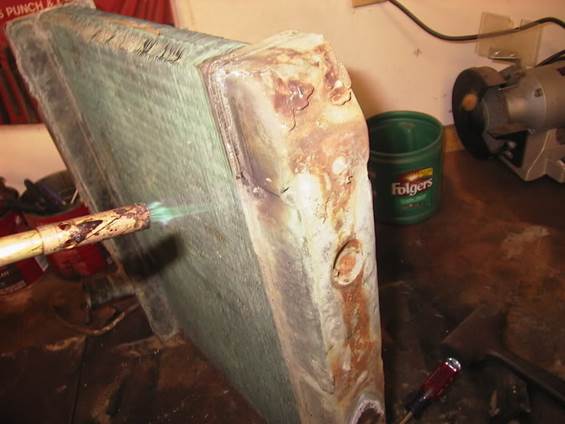
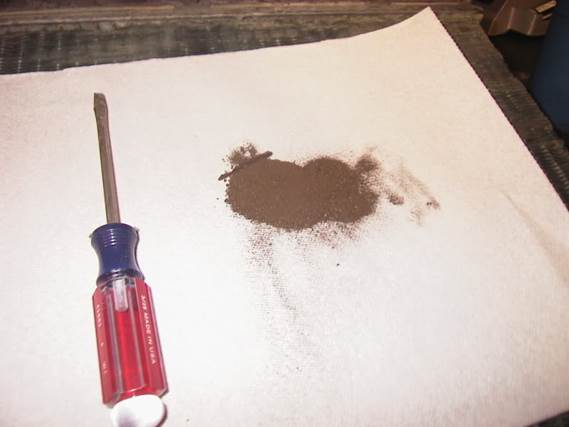
Here I am sweating the solder from the lower tank seam. Let gravity do much of the work. As you heat things up the two parts tend to seperate with the heat. Be patient. I used a putty knife to scrape hot solder out of the joint. Worked for about 20min but did not have it apart yet. Another 10min should do it. The last radiator I did this on it came apart in about 20min or so. Just look for areas that are still soldered. Heat them up and work as much solder out of the joint as you can and wiggle the joint as it cools so it does not rejoin.

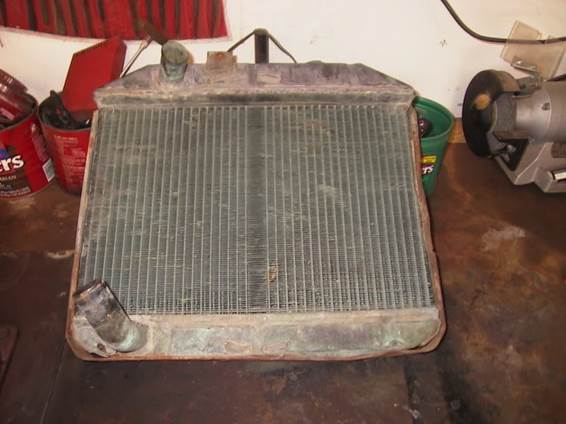
That's as far as I got tonight. Had to take Carl to his Boy Scout meeting.
Lew
Lew Ladwig
CMHG, 9th ID, Commander
BSA Crew 42 Advisor, 9th ID reenactors
CFFC, IFFC president
2-'47 cj2a's
1-'45 gpw in full resto mode

Schultzd
G-Colonel
G-Colonel
Posts: 1611
Joined: Sun Jun 26, 2005 6:39 pm
Location: Saint Stephen, MN

Post by Schultzd » Wed Apr 08, 2009 3:52 am

Really lookng forward to this. Hope they make it sticky!

Dan
Dan Schultz
Retired USA SFC
GP 9275
GPW 14944 M38 MC70324
M38A1 MD20035
K-38 Lineman Trailer

Lew Ladwig
G-Major General
G-Major General
Posts: 3092
Joined: Wed Dec 25, 2002 6:58 pm
Location: Lafayette, Colorado

Post by Lew Ladwig » Wed Apr 08, 2009 6:01 pm

Tonights work went well.
Here is the lower tank which came off with about 5min more work:
Image

This is about 1/3 of the dirt from the bottom tank:
Image

I'll clean the solder from the tube joint as it was cracked. When I get ready to redo the joint all surfaces must be shinny clean to bare metal.
Image

I have one spot that has a folded tent. I don't think I can pound it smooth but will try to reshape the area. I use body tools for this work. I removed several other small dents. The bottom was bulged out due to freezing so I pounded that back and reshaped the sides using a 2" square tubing as an anvil. Came out well.
Image

That's enough for tonight. Carl want's DQ!
Lew
Lew Ladwig
CMHG, 9th ID, Commander
BSA Crew 42 Advisor, 9th ID reenactors
CFFC, IFFC president
2-'47 cj2a's
1-'45 gpw in full resto mode

User avatar
Jon
Australian Army (Retired) R.A.E.M.E.
Posts: 11949
Joined: Mon May 04, 1998 8:00 pm
Location: Down Under In Queensland
Contact:

Post by Jon » Wed Apr 08, 2009 6:05 pm

Lew....

If you need the GPW shroud drawings let me know...

Very interesting job you're doing there....
:lol:

JR
Jon Rogers
AUSTRALIA


http://jeepdraw.com JeepDraw Home Page & Drawings
Parts Colours Page http://jeepdraw.com/PART_COLOURS.htm
1944 GPW195611 20531384 ACM-2 17781
1942 MBT 19433W

User avatar
Chuck Lutz
Gee Addict
Posts: 26829
Joined: Wed Jun 28, 2006 7:00 am
Location: Jeep Heaven

Post by Chuck Lutz » Thu Apr 09, 2009 6:50 am

Lew, I'm sure there is a tool for it.....but I straightened all the bent fins by usin TWO putty knives. I got one above and one below each fin that was bent and pressed the tips together then PULLED them away from the core. I never bothered with them too much, as they are WAVY to begin with, but 99% of the big dents from bugs, the fan and finger damage to them was pulled out smooth this way and your core looks to be in pretty good shape.

Hopefully the tubes will be OK and hold pressure, but I don't think soldering up one or two will be too hard on the cooling system, you don't exactly live in the Sahara.

The say I did it took time but it was easy and I was careful not to damage the tubes behind the fins.

Did you put any air pressure into this one and submerge it prior to deisassembly to check for leaky tubes?
Chuck Lutz

GPW 17963 4/24/42 Chester, PA. USA 20113473 (USA est./Tom W.)
Bantam T3-C 1947

Lew Ladwig
G-Major General
G-Major General
Posts: 3092
Joined: Wed Dec 25, 2002 6:58 pm
Location: Lafayette, Colorado

Post by Lew Ladwig » Thu Apr 09, 2009 7:17 am

Chuck,
I did not try to pressure test this one in advance of the repairs because it had an obvious crack on the lower pipe and a small crack in the bottom tank were the dent was folded.

I agree that if I have to fix a tube leak it won't hurt. If I take my time I think I can fix most tube leaks and still have flow in that tube. My idea is to use my rodding tool I made as a backing tool to keep the solder from filling the tube. The tool is made of aluminum.

The last one I fixed I used a small wide flat bladed pliars to fix the fins. Just sat there in front of the TV and worked away. A couple of shows later I was done and it looked nice.

Thanks,
Lew
Lew Ladwig
CMHG, 9th ID, Commander
BSA Crew 42 Advisor, 9th ID reenactors
CFFC, IFFC president
2-'47 cj2a's
1-'45 gpw in full resto mode

User avatar
William
G-Colonel
G-Colonel
Posts: 1646
Joined: Fri Dec 20, 2002 8:54 am
Location: Belgium

Post by William » Thu Apr 09, 2009 10:32 am

Good job :!: Don't forget to sandblest everything before you put it back together :wink:

regards , William
Facebook groups :

1941 FORD GP
Early Willys Jeeps

Lew Ladwig
G-Major General
G-Major General
Posts: 3092
Joined: Wed Dec 25, 2002 6:58 pm
Location: Lafayette, Colorado

Post by Lew Ladwig » Thu Apr 09, 2009 10:48 am

William,
Thanks.
I was hoping to work out a method to remove the oxides. I see some folks clean copper with a paste of flour, white vingar, and salt. I would prefer a solution so I can get in the tubes and fins.
Lew
Lew Ladwig
CMHG, 9th ID, Commander
BSA Crew 42 Advisor, 9th ID reenactors
CFFC, IFFC president
2-'47 cj2a's
1-'45 gpw in full resto mode

Lew Ladwig
G-Major General
G-Major General
Posts: 3092
Joined: Wed Dec 25, 2002 6:58 pm
Location: Lafayette, Colorado

Post by Lew Ladwig » Fri Apr 10, 2009 9:28 am

I spent a little time last night experimenting with different methods to clean the parts.
The white vinegar method is worthless.
Not even muratic acid staight from the jug did much. I even heated the acid a bit and while with some srubbing I did get some tarnish off I think it was mostly the scrubbing pad doing the work.
I also tried the electrolysis method in a base solution. That did nothing.
So now I am looking for the next step.
I don't want to take it to a shop as I would feel defeated. I like to figure out the how and why of these processes and do them myself.
Any ideas?
Lew
Lew Ladwig
CMHG, 9th ID, Commander
BSA Crew 42 Advisor, 9th ID reenactors
CFFC, IFFC president
2-'47 cj2a's
1-'45 gpw in full resto mode

User avatar
Chuck Lutz
Gee Addict
Posts: 26829
Joined: Wed Jun 28, 2006 7:00 am
Location: Jeep Heaven

Post by Chuck Lutz » Fri Apr 10, 2009 10:00 am

Lew....I would not feel defeated if I had to have the radiator shop boil out the core and parts.....I don't know what is in their tank, but they might tell you if you dropped by to check on a price for just doing that phase of the job for you.

I wonder if the solution and the temp are the kind of things you can set up in the garage or not, so that may be the way to go?
Chuck Lutz

GPW 17963 4/24/42 Chester, PA. USA 20113473 (USA est./Tom W.)
Bantam T3-C 1947

User avatar
petesilfven
G-General
G-General
Posts: 8933
Joined: Tue Mar 09, 2004 2:07 pm
Location: Dearborn, MI

Post by petesilfven » Fri Apr 10, 2009 1:42 pm

Try a hot caustic solution (lye). Should shine things right up. It's nasty, though. Will eat right through leather and people. Rubber gloves, apron, gloves, and also goggles recommended. No kids or dogs around, either.
MVPA 21473, GLMVPA
USN 1959-65 USS GALVESTON CLG3
NRA Benefactor Member

User avatar
Jon
Australian Army (Retired) R.A.E.M.E.
Posts: 11949
Joined: Mon May 04, 1998 8:00 pm
Location: Down Under In Queensland
Contact:

Post by Jon » Fri Apr 10, 2009 1:50 pm

There's a product that may work, it's called "CLR".. for Calcium, Lime, Rust.
Smells bad....but worth the try...

JR
Jon Rogers
AUSTRALIA


http://jeepdraw.com JeepDraw Home Page & Drawings
Parts Colours Page http://jeepdraw.com/PART_COLOURS.htm
1944 GPW195611 20531384 ACM-2 17781
1942 MBT 19433W


Post Reply

Return to “MB GPW Technical Knowledge Base”

Who is online

Users browsing this forum: Google [Bot], Google Adsense [Bot] and 69 guests