1941 - 1945, MB, GPW Technical questions and discussions, regarding anything related to the WWII jeep.
-
warbirdphotog
- G-Sergeant Major

- Posts: 176
- Joined: Wed Oct 03, 2018 10:54 pm
- Location: Southern California
-
Contact:
Post
by warbirdphotog » Mon Feb 04, 2019 1:59 pm
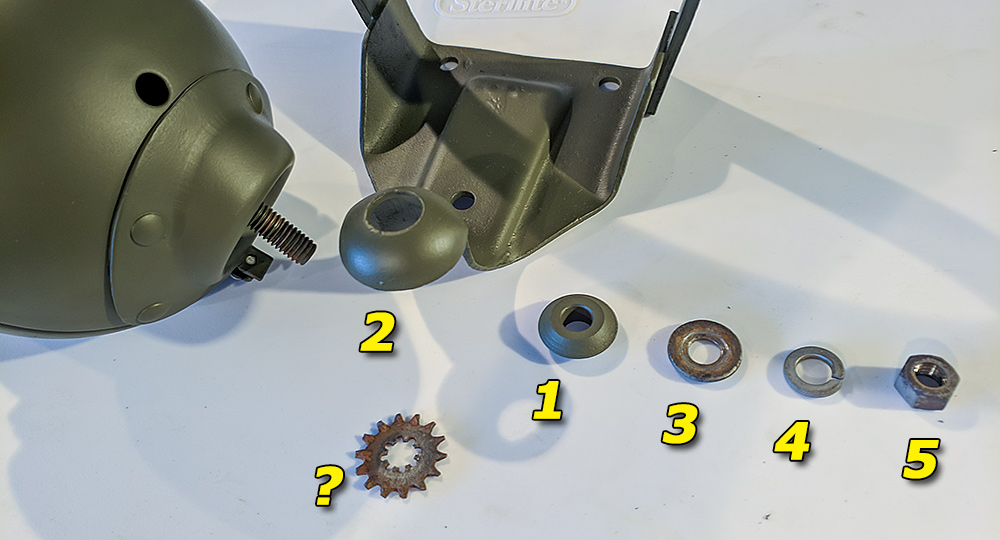
So, based on what I've read so far, should it go:
Blackout Drive Light, fat adjusting washer (1), BO Guard (2), Washer (3), Lock Washer (4), and Nut (5)?
So where would the star washer go in this lineup?
-
blackstone
- G-First Sergeant

- Posts: 138
- Joined: Fri Dec 05, 2014 3:18 pm
- Location: Bundaberg Australia
Post
by blackstone » Mon Feb 04, 2019 6:32 pm
Hi Warbird, As has been said pull off that bit of rubber tube and then by the parts book, a 3/8 star (shake proof) washer is not used in this assembly but
5/16" shake proof washers were used in mounting the bracket to the fender to continue the earth return. So throw the bit of hose, put the bracket on the light stud, put the adjusting washer on with the large curved side toward the bracket, put on the lock washer, put on the nut. Now you should find that the light can swivel around to have the light point where it should. The mangled flat washer isn't listed in my parts book either. All of my books are for 1942 so if any thing changed some one else can correct. You need a parts book to avoid this confusion, its all in there, just got to scratch through it all. Alan
-
Chuck Lutz
- Gee Addict
- Posts: 26829
- Joined: Wed Jun 28, 2006 7:00 am
- Location: Jeep Heaven
Post
by Chuck Lutz » Tue Feb 05, 2019 8:33 am
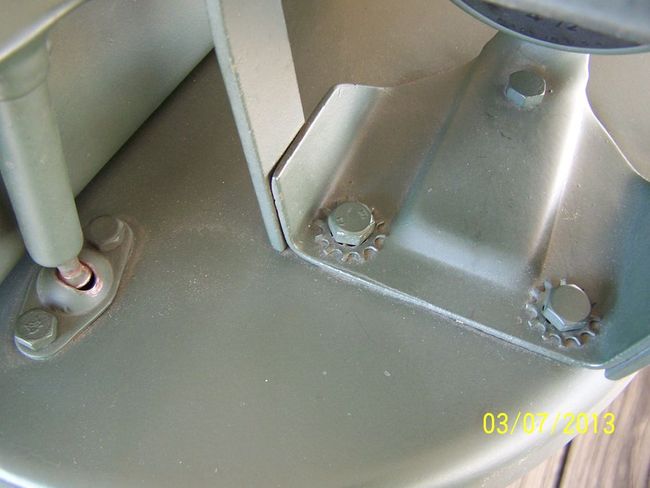
The toothed washer(s) goes under the fender where it can cut through and achieve a good ground. There are TWO of them, using the two bolts that hold the front of the Fender BO bracket.

- Fender Black Out Mounting Hardware.jpg (56.91 KiB) Viewed 2503 times
Chuck Lutz
GPW 17963 4/24/42 Chester, PA. USA 20113473 (USA est./Tom W.)
Bantam T3-C 1947
-
warbirdphotog
- G-Sergeant Major
- Posts: 176
- Joined: Wed Oct 03, 2018 10:54 pm
- Location: Southern California
-
Contact:
Post
by warbirdphotog » Tue Feb 05, 2019 1:10 pm
blackstone wrote: ↑Mon Feb 04, 2019 6:32 pm
Hi Warbird, As has been said pull off that bit of rubber tube and then by the parts book, a 3/8 star (shake proof) washer is not used in this assembly but
5/16" shake proof washers were used in mounting the bracket to the fender to continue the earth return. So throw the bit of hose, put the bracket on the light stud, put the adjusting washer on with the large curved side toward the bracket, put on the lock washer, put on the nut. Now you should find that the light can swivel around to have the light point where it should. The mangled flat washer isn't listed in my parts book either. All of my books are for 1942 so if any thing changed some one else can correct. You need a parts book to avoid this confusion, its all in there, just got to scratch through it all. Alan
Thanks Alan! I have the RFJP book that details the breakdown, but it's difficult to figure out some of the parts at times. for example, most diagrams I've seen don't show that adjusting washer.
Chuck Lutz wrote: ↑Tue Feb 05, 2019 8:33 am
The toothed washer(s) goes under the fender where it can cut through and achieve a good ground. There are TWO of them, using the two bolts that hold the front of the Fender BO bracket.
Very helpful, thanks Chuck!
-
Scrumps
- G-Lieutenant Colonel

- Posts: 1039
- Joined: Thu Aug 17, 2017 11:39 am
- Location: Somerset UK
Post
by Scrumps » Fri Feb 08, 2019 9:02 am
warbirdphotog wrote: ↑Mon Feb 04, 2019 1:59 pm
So, based on what I've read so far, should it go:
Blackout Drive Light, fat adjusting washer (1), BO Guard (2), Washer (3), Lock Washer (4), and Nut (5)?
So where would the star washer go in this lineup?
Hi,
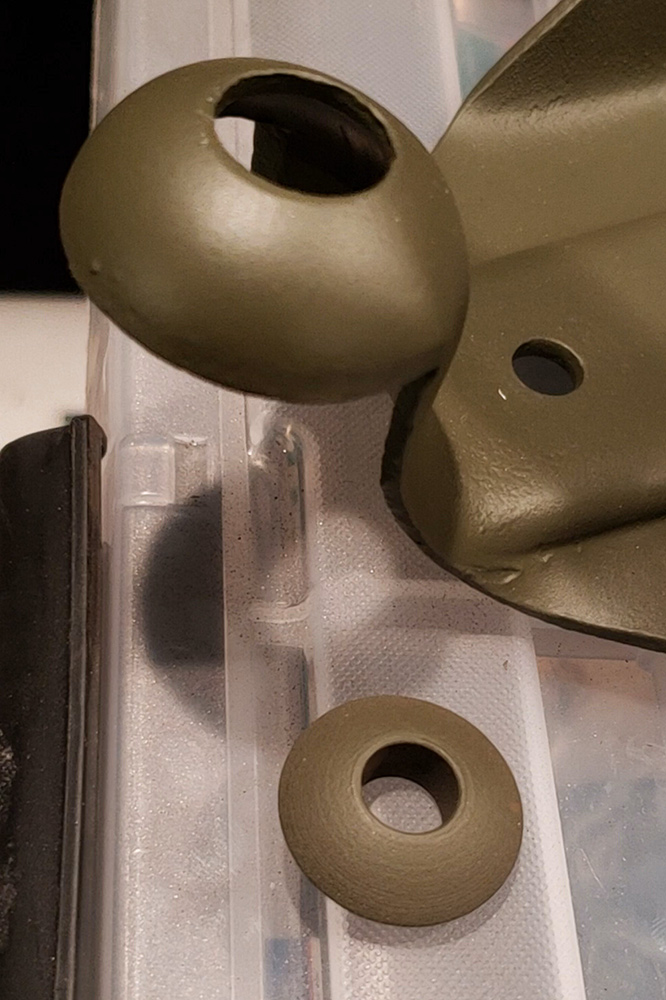
With your numbering it should go light then bracket(2), strange washer (1) then 3,4,5.
The light, bracket and funny washer form a ball joint to allow light adjustment. The funny washer turns the concave surface of the bottom of the bracket into a flat surface for the lock washer and nut to secure against.
Scrumps
Dec '42 Willys MB
Aug ‘44 Willys MB
2021 New Defender 90 D250 HSE
2005 Landrover 90 CSW
2024 Range Rover Sport
1967 MGB
Royal Navy Weapons Engineer 1979-2007.
-
mdainsd
- G-Colonel

- Posts: 1925
- Joined: Mon Oct 16, 2017 1:01 pm
- Location: San Diego, CA
Post
by mdainsd » Fri Feb 08, 2019 9:35 am
As mentioned #1 is upside down in your photo.
52 M38 2X, '52 M37, '44 WC51, '42 WC 56/57, '50 CJ-V35(U), '42 GPW, '44 M3A1 Scout Car, 2010 M-Gator
-
warbirdphotog
- G-Sergeant Major
- Posts: 176
- Joined: Wed Oct 03, 2018 10:54 pm
- Location: Southern California
-
Contact:
Post
by warbirdphotog » Mon Feb 11, 2019 12:00 am
Scrumps wrote: ↑Fri Feb 08, 2019 9:02 am
Hi,
With your numbering it should go light then bracket(2), strange washer (1) then 3,4,5.
The light, bracket and funny washer form a ball joint to allow light adjustment. The funny washer turns the concave surface of the bottom of the bracket into a flat surface for the lock washer and nut to secure against.
Scrumps
Scrumps, you are the man! Thank you! So, that leaves the question then, what all (in those bunch of washers/nut) needs to have metal to conduct the ground/neutral? I would imagine the 'funny washer' would need to have metal exposed to send back to the Blackout drive light guard which then has some exposed metal to send to the fender? I also would imagine the underside of the guard where it touches the funny washer would need to have exposed metal?
-
warbirdphotog
- G-Sergeant Major
- Posts: 176
- Joined: Wed Oct 03, 2018 10:54 pm
- Location: Southern California
-
Contact:
Post
by warbirdphotog » Wed Feb 13, 2019 2:00 pm
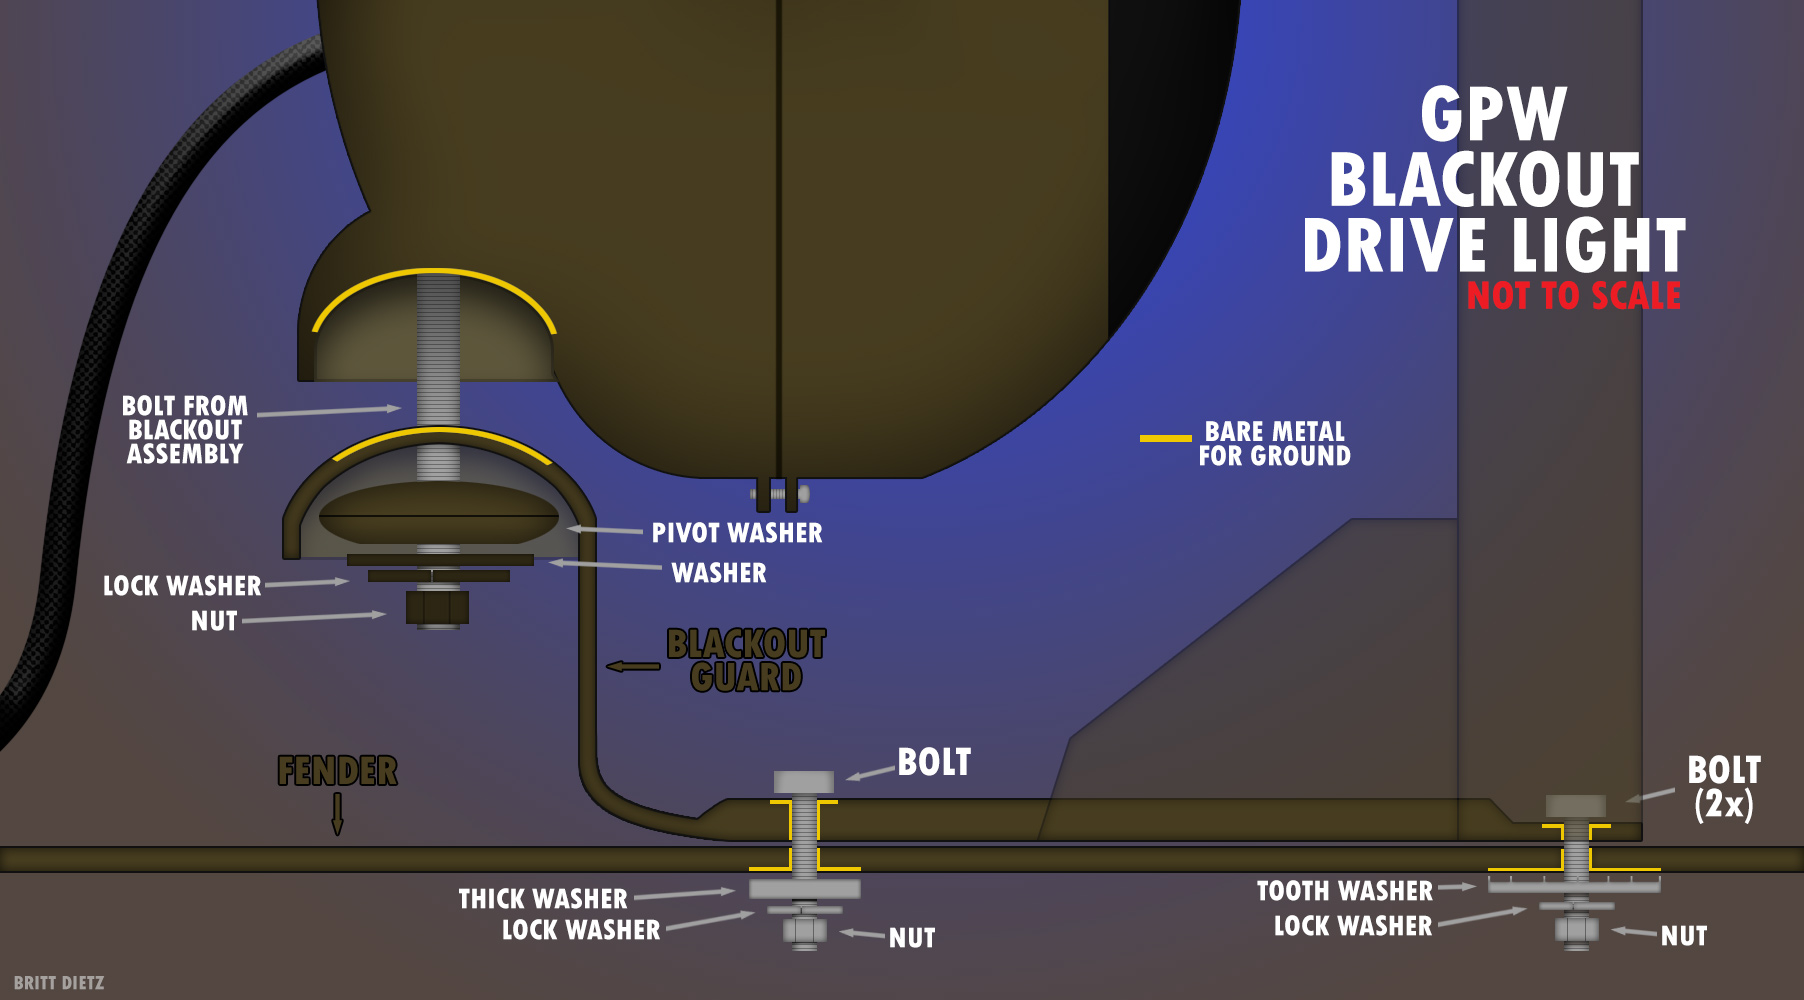
Since I can't really find many references on what needs to be metal, I put this (not to scale) diagram together. The areas in yellow I assume need to have the paint removed for good contact to the fender. Look about right? I hope this diagram helps people looking for this information in the future as it would have helped me! I'll change the diagram if someone spots any errors.
EDIT - Diagram removed, please see new one: http://www.warbird-photos.com/ImageTemp/Blackout9.jpg
Last edited by
warbirdphotog on Thu Feb 14, 2019 3:29 pm, edited 2 times in total.
-
Ian Fawbert
- G-Lieutenant General

- Posts: 3599
- Joined: Fri Dec 13, 2002 2:54 pm
- Location: Sydney, Australia.
-
Contact:
Post
by Ian Fawbert » Wed Feb 13, 2019 7:44 pm
Hi mate,
Nice diagram! The only issue i see with the diagram for a GPW (completely different for a MB) is the order/components to mount to the fender- there is no flat washer on the front 2 bolts underneath and no tooth washer on the rear bolt.
It should be:
GPW
FRONT 2 bolts:
Bolt head
BO bracket
Fender
Internal/external GPW type tooth washer (the washer you have labelled as ? is a GPW style)
split lock washer
nut
REAR bolt:
bolt head
BO bracket
fender
THICK (GPW) body bolt style FLAT washer
split lock washer
nut
For a MB:
FRONT 2 bolts:
Bolt head
Internal/external MB type tooth washer (style is different to the GPW style in shape/size)
BO bracket
Fender
Internal/external MB type tooth washer
split lock washer
nut
REAR bolt
Bolt head
BO bracket
Fender
Flat washer (standard thickness).
split lock washer
nut
Hope this helps,
Ian.
-
JAB
- G-General

- Posts: 9649
- Joined: Fri Dec 13, 2002 5:25 pm
- Location: under the jeep in North Prairie, WI
Post
by JAB » Thu Feb 14, 2019 9:27 am
I think the bare metal parts marked in yellow are either incorrect or incomplete. The only area that I've found that appeared to be bare (rusty, now) is the concave portion of the light body and the convex portion of the bracket. On your drawing it would be the area between what you have labeled "bolt from blackout assembly". This way the light housing, which the bulb is grounded to, is directly grounded to the bracket, rather than indirectly as would be if this area were painted and rely soley on the fastener.
-Jeff
GR8GPN2U!!!


-
warbirdphotog
- G-Sergeant Major
- Posts: 176
- Joined: Wed Oct 03, 2018 10:54 pm
- Location: Southern California
-
Contact:
Post
by warbirdphotog » Thu Feb 14, 2019 2:26 pm
Ian Fawbert wrote: ↑Wed Feb 13, 2019 7:44 pm
Hi mate,
Nice diagram! The only issue i see with the diagram for a GPW (completely different for a MB) is the order/components to mount to the fender- there is no flat washer on the front 2 bolts underneath and no tooth washer on the rear bolt.
Thanks Ian! That helps, I'll redo the diagram and show the other bolt spots. I figure someone with this issue will find this thread and the diagram will be helpful.
-
warbirdphotog
- G-Sergeant Major
- Posts: 176
- Joined: Wed Oct 03, 2018 10:54 pm
- Location: Southern California
-
Contact:
Post
by warbirdphotog » Thu Feb 14, 2019 3:22 pm
Ian Fawbert wrote: ↑Wed Feb 13, 2019 7:44 pm
Nice diagram! The only issue i see with the diagram for a GPW (completely different for a MB) is the order/components to mount to the fender- there is no flat washer on the front 2 bolts underneath and no tooth washer on the rear bolt.
JAB wrote: ↑Thu Feb 14, 2019 9:27 am
I think the bare metal parts marked in yellow are either incorrect or incomplete....
So, using what both you posted, would this be the correct diagram? (expanded for the front bolts and the yellow metal contact changed for the bracket to assembly)
 To enlarge image: http://www.warbird-photos.com/ImageTemp/Blackout9.jpg
-
JAB
- G-General
- Posts: 9649
- Joined: Fri Dec 13, 2002 5:25 pm
- Location: under the jeep in North Prairie, WI
Post
by JAB » Thu Feb 14, 2019 6:26 pm
warbirdphotog wrote: ↑Thu Feb 14, 2019 3:22 pm
Ian Fawbert wrote: ↑Wed Feb 13, 2019 7:44 pm
Nice diagram! The only issue i see with the diagram for a GPW (completely different for a MB) is the order/components to mount to the fender- there is no flat washer on the front 2 bolts underneath and no tooth washer on the rear bolt.
JAB wrote: ↑Thu Feb 14, 2019 9:27 am
I think the bare metal parts marked in yellow are either incorrect or incomplete....
So, using what both you posted, would this be the correct diagram? (expanded for the front bolts and the yellow metal contact changed for the bracket to assembly)
I believe so. BTW, that's a beautiful diagram!
-Jeff
GR8GPN2U!!!
-
Mark Tombleson
- MZ Radio Operator
- Posts: 9837
- Joined: Wed Dec 11, 2002 7:58 pm
- Location: Selah, Washington
Post
by Mark Tombleson » Thu Feb 14, 2019 10:09 pm
That is a great diagram!
My MB.
Only comment I have is the shakeproof(star/toothed) washer is designed to cut thru the paint and form a bond without the paint being removed.
The GPW design appears to be missing the top washer to function properly if only one was specified or maybe it goes between the bracket and fender like on the hood hinge.
MB-NAVY-MZ-1 352625 - 07/20/44 (DOD est.)
U.S.N. 133818
2nd place Restored Class 2008 Portland Convention
MVPA Hall of Fame - 2013
-
warbirdphotog
- G-Sergeant Major
- Posts: 176
- Joined: Wed Oct 03, 2018 10:54 pm
- Location: Southern California
-
Contact:
Post
by warbirdphotog » Thu Feb 14, 2019 10:58 pm
JAB wrote: ↑Thu Feb 14, 2019 6:26 pm
I believe so. BTW, that's a beautiful diagram!
Mark Tombleson wrote: ↑Thu Feb 14, 2019 10:09 pm
That is a great diagram!
Only comment I have is the shakeproof(star/toothed) washer is designed to cut thru the paint and form a bond without the paint being removed.
The GPW design appears to be missing the top washer to function properly if only one was specified or maybe it goes between the bracket and fender like on the hood hinge.
Thank you both! I'd love to do more of these diagrams if I have the information to make them correct.
Mark - That's true on the star/tooth/shakeproof washer. I could remove the bare metal there on the diagram, but I figure that helps let someone else know to make sure the washer, or the lack of paint somehow, it there for a good connection. I haven't seen a shot of a GPW Blackout Drive Light (so far at least) with any washers on the top under the bolt head. Are there any other GPW photos of the blackout light that might shed light on this?
Who is online
Users browsing this forum: ahaydon, Google Adsense [Bot] and 81 guests


