Page 1 of 2
brkt. in heater kit
Posted: Sat Nov 30, 2019 9:51 am
by buzzinduzzin
In the process of installing a 2540-00-764-5917 n.o.s. hot water heater kit in my 1972 (?) A2; What is the 10921904 brkt. for?? Also on the drilling instructions for the flip up air scoop location: " measure 3-9/16 in. left from cowl right side sheet metal edge etc." that is wrong ! it took me 3-15/16 in. to properly locate heater assy; Did I do something wrong ?? Last but not least, where can I hire a midget acrobat with small hands to do the work behind the dash ?
Re: brkt. in heater kit
Posted: Sat Nov 30, 2019 4:11 pm
by Kurt Lesser
If you had done some research before installing the heater kit you would have found out what everyone else who has ever installed one: the drawing in the kit is wrong.
Re: brkt. in heater kit
Posted: Sun Dec 01, 2019 1:38 pm
by buzzinduzzin
thanks for the partial reply.will my suggested exhaustive research tell me about the bracket ? I belong to other forums concerning old tractors, old Ford trucks& old farm equipment, your response is like a lot of the experts who are annoyed by the same questions being asked over & over! So that leads me to more questions: #1 what is the use of a CHAT forum if I am supposed to "google" everything ? # 2 are you trying to scare off thin skinned novices as part of gaining new members ? # 3 why not just ignore questions that are beneath you ?
Re: brkt. in heater kit
Posted: Mon Dec 02, 2019 5:11 am
by muttguru
Buzz.......
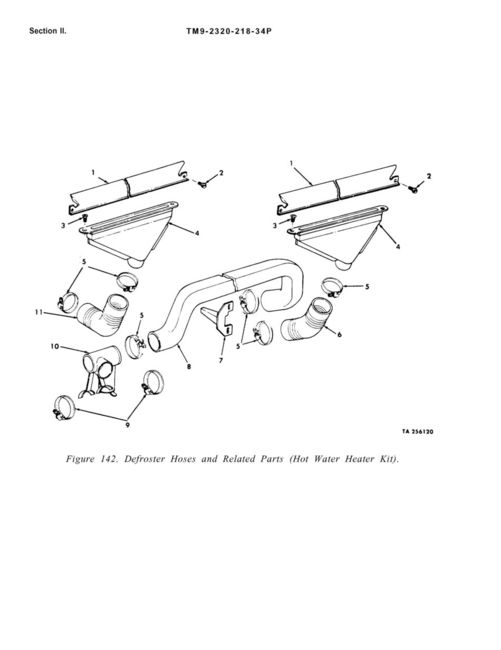
keep calm, old chum. That part is Item-7 in the picture......, described as "Bracket, Support". See below......
Can't supply you with a midget, sorry...they're in very short supply !
Ken
Re: brkt. in heater kit
Posted: Mon Dec 02, 2019 5:35 am
by Rickf
I have to say that Kurt's answer was more than a bit inappropriate. I have been involved with M-151's for close to 20 years and I also run the g838.org website and I did not know about the hole discrepancy. I do remember finding out about it the same as you but I thought it was me and that was the end of that. I personally have no time for the RTFM types, that is why these forums exist, to help people. Anyway, if you ever find that midget tell him I have some work for him also. My heater is still in the box and will remain there until someone shorter than my old 6'3" can get in there to install it.
Re: brkt. in heater kit
Posted: Mon Dec 02, 2019 8:47 am
by buzzinduzzin
Thank you for the replies! the -10 & - 34P came with with the jeep & the rest are on order from Kevin. I was able to copy the 32 pages of instructions from a website but the cover said it was a -34-1 ? The backing plate behind the Lt. sw. & ign. sw. was installed on the outside of the dash & after removing everything I found that someone had butchered in a new lgt. sw. hole to the right of the factory hole ?? This backing plate was installed backwards to cover factory hole! Here is my question: is this 19207-12356650 the correct plate for a 1972/ A2 ? if so then the ign. sw. wont be in the same location as the picture in my -10 . Could someone please post pictures of a "correct" A2 dash with hotwater heater installed? The pictures will also help with some data plate location questions.
once again thank you
Re: brkt. in heater kit
Posted: Mon Dec 02, 2019 9:33 am
by D Pizzoferrato
Much butchering was required to mount the ROPs Kit. The Light Switch had to be moved to the right to give clearance to the forward ROPs tube. The plate you describe was part of the ROPs Kit. It was necessary to butcher an appropriate hole in the dash, to the right of the light switch. The plate served as a mount for the relocated switch and to cover the original factory mounting hole.
To your initial question, the #7 bracket attaches to the speedo mounting lugs. It's purpose was to force the air duct hose up and over the centerline of the speedo drive so that the speedo cable wouldn't kink.
I've always installed the heater kits with the vehicle mounted in a rotisserie. If done at the right point in the build, no midgets are necessary. Full disclosure, back when I was young and more agile (1983ish), I did install a heater kit in a complete vehicle. Never gave a thought to using a midget, but it could have been helpful.
Re: brkt. in heater kit
Posted: Mon Dec 02, 2019 10:16 am
by markrdje
Ya, I installed a heater in the 151 and it was tough going, followed the TM instructions
Re: brkt. in heater kit
Posted: Mon Dec 02, 2019 2:18 pm
by Rickf
D Pizzoferrato wrote: ↑Mon Dec 02, 2019 9:33 am
Much butchering was required to mount the ROPs Kit. The Light Switch had to be moved to the right to give clearance to the forward ROPs tube. The plate you describe was part of the ROPs Kit. It was necessary to butcher an appropriate hole in the dash, to the right of the light switch. The plate served as a mount for the relocated switch and to cover the original factory mounting hole.
To your initial question, the #7 bracket attaches to the speedo mounting lugs. It's purpose was to force the air duct hose up and over the centerline of the speedo drive so that the speedo cable wouldn't kink.
I've always installed the heater kits with the vehicle mounted in a rotisserie. If done at the right point in the build, no midgets are necessary. Full disclosure, back when I was young and more agile (1983ish), I did install a heater kit in a complete vehicle. Never gave a thought to using a midget, but it could have been helpful.
You were young once?


I have to give you credit Dave, You are not exactly a small man and all the work you have done on that boat shows that you can still bend and twist when needed.
Re: brkt. in heater kit
Posted: Mon Dec 02, 2019 2:25 pm
by 199th MP
i'm not a big guy at all, just really old, and i had a heck of a time installing the heater. i had a NOS kit, and all the manuals, and a considerable amount of experience wrenching. i thought the heater would be a nice addition, and the defroster vents would help keep the glass clear. in the end, it was much more trouble than it was worth. i also didn't know about the hole discrepancy, but i'm pretty good with a measuring tape, and cruised right through that part. thank God i will never have to do one of those jobs again. i wish you serious good luck.
Re: brkt. in heater kit
Posted: Mon Dec 02, 2019 4:37 pm
by D Pizzoferrato
Rickf wrote: ↑Mon Dec 02, 2019 2:18 pm
all the work you have done on that boat shows that you can still bend and twist when needed.
And the pain lingers on longer each time!
Re: brkt. in heater kit
Posted: Tue Dec 03, 2019 2:30 pm
by lpcoating
Re: brkt. in heater kit
Posted: Tue Dec 03, 2019 2:40 pm
by lpcoating
So while we're on the topic of heaters, when the bottom vents are closed, can you actually feel the defrost blow heat? My A2 has a heater but not much happens when the vents are closed. I've not really looked up under the dash and I'm not sure if all the pieces are installed.
Guy
Re: brkt. in heater kit
Posted: Tue Dec 03, 2019 3:18 pm
by Rickf
I am curious about that myself, I have heard from many people that said it is negligible at best. Seems to me that you are blowing hot air into a hollow body cavity which in turn has to find its way to the holes on top of the cowl that may or may not be blocked by the windshield gasket and junk and then into the huge open windshield frame cavity. You certainly are not going to get any hot air after all of that travel through cold metal if you get any air at all. I am sure there are many places on the body for the air to escape.
Re: brkt. in heater kit
Posted: Tue Dec 03, 2019 5:46 pm
by 199th MP
rick, that is exactly what happens. the interior of the windshield frame is constructed with NO channels to funnel the air flow to the defroster vents. that leaves the air flow attempting, and failing, to fill that entire cavity. the end result is little to no actual air pressure arriving where it is needed. the only remedy i can think of would involve a first rate welder, and splitting the inner and outer frame skins, fabricating and installing airflow channels, re-assembling and welding the frame back together, and then putting it back in place after painting it. an awful lot of work for very little gain. had i realized how inadequate the air flow would be, i never would have gone through the time and expense of installing that heater.